How to Light Your LEGO Display: LED Kits & DIY Setup Guide
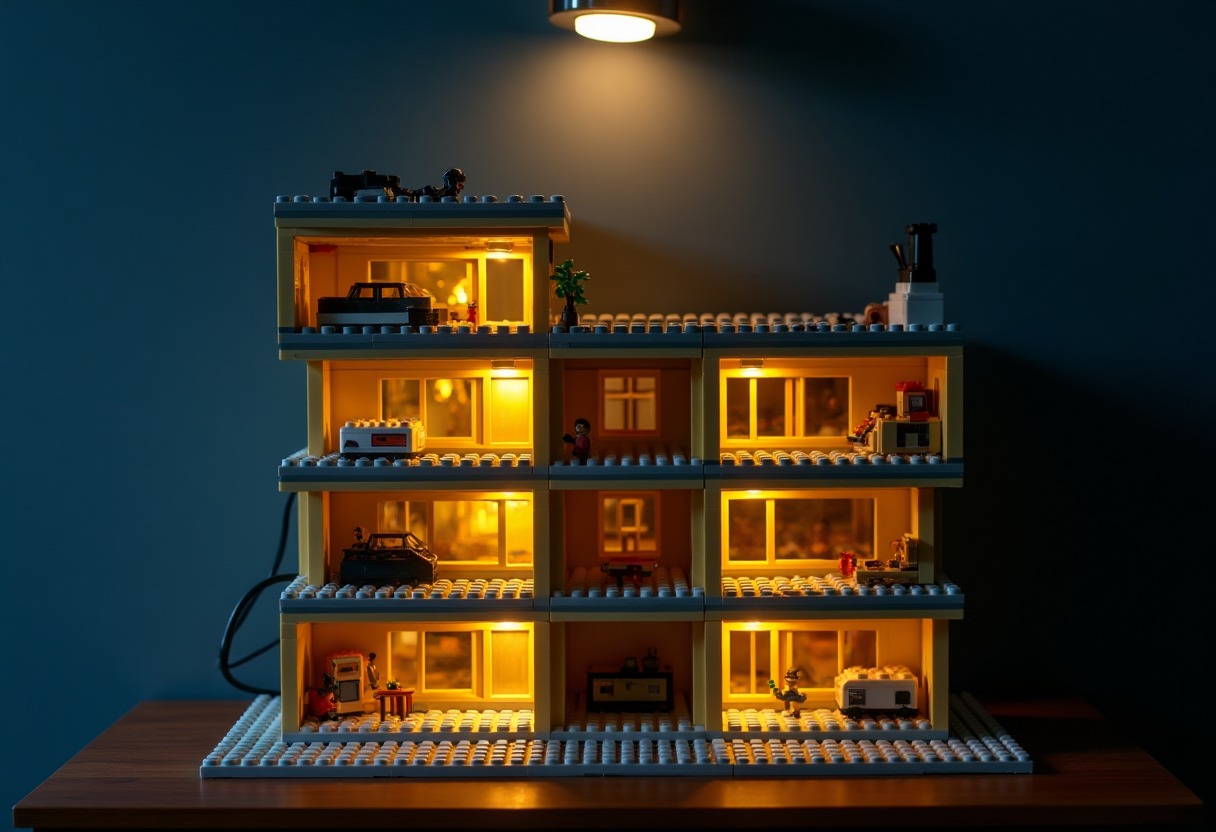
You've spent hours building your collection, but under standard room lighting, half the detail disappears. Proper LEGO display lighting transforms a shelf of bricks into a showcase—interior builds become visible, translucent pieces glow, and dark sets finally get the definition they deserve.
Why LEGO Display Lighting Changes Everything
Most collectors position sets on shelves under ceiling lights, which creates top-down shadows that obscure interior details and flatten depth. LEGO's own official stores use strategic LED placement to highlight architectural features, cockpit interiors, and minifigure scenes—the same principle works at home.
Proper lighting reveals three things standard room light can't: interior MOC details that builders spent hours perfecting, translucent element glow (especially critical for Space and Creator Expert sets), and color accuracy for photography. A $20 LED kit makes a $400 UCS set look twice as impressive, which matters whether you're building for display purposes or eventual resale in the investing market.
The challenge isn't whether to add lighting—it's choosing between pre-wired LEGO-specific kits that plug directly into builds versus general LED strips that cost less but require DIY installation. Both work, but your choice depends on budget, technical comfort, and how permanent you want the setup.
LEGO-Specific Light Kits vs. Generic LED Strips
Pre-made LEGO light kits from brands like Light My Bricks, Lightailing, and BriksMax include custom wiring designed to snake through specific sets. These kits match official LEGO set numbers, come with printed instruction booklets, and use thin wires that hide in seams and behind plates. You're paying for convenience—most kits run $30-80 depending on set complexity.
Generic LED strips from hardware or electronics retailers cost $12-25 for 16 feet of lights, but require you to plan wire routing, cut strips to length, and hide the installation yourself. The lights themselves often produce better output (higher CRI values, more lumens per foot), but you'll spend 2-3 hours figuring out placement versus 45 minutes with a kit.
For first-time lighting projects, → Shop LEGO LED light kits on Amazon offer the smoothest path. For collectors lighting multiple sets or entire shelving units, → Shop USB LED strip lights on Amazon provide better value once you've learned basic techniques.
The biggest functional difference: LEGO kits use 5mm and 3mm point lights that simulate lamps, headlights, and windows, while LED strips provide ambient wash lighting for entire shelves. Most serious display setups combine both—strips for base illumination, point lights for accent features.
Comparing Lighting Solutions: What Works for Different Display Types
| Solution Type | Best For | Cost Range | Installation Time | Expandability | |--------------|----------|------------|-------------------|---------------| | Official LEGO-Specific Kits | Single flagship sets (UCS, Modular Buildings, Architecture) | $35-85 per set | 30-60 minutes | Limited—each kit fits one set | | Generic Warm White LED Strips | Shelf lighting, Minifigure displays, multi-set collections | $15-30 per 16ft roll | 1-2 hours first time | High—cut and extend easily | | Battery-Powered Puck Lights | Temporary displays, bookcase accent lighting, no-drill setups | $20-35 per 6-pack | 10 minutes | Medium—adhesive backed | | Smart RGB LED Strips | Color-changing effects, app control, photography setups | $25-50 per 16ft | 1-2 hours | High—sync multiple strips |
The setup hierarchy for most collectors starts with LED strips for shelf underlighting (creates that museum-quality glow), adds LEGO-specific kits to 2-3 hero sets, then expands with → Shop battery powered LED lights on Amazon for rotating seasonal displays. Budget $100-150 to properly light a 6-foot Billy bookcase with mixed sets.
Installing LED Strip Lights: The DIY Method That Saves Money
Standard LED strips come in 12V or 5V varieties—stick with 5V USB-powered strips for LEGO displays because they're safer around plastic, generate less heat, and plug into the same USB hubs powering phones and tablets. Most strips include adhesive backing, but the factory adhesive fails on textured surfaces after 3-6 months.
Here's the installation sequence that actually lasts: clean shelf edges with isopropyl alcohol, let dry completely, apply 3M VHB tape to the shelf (not the LED strip backing), then press the strip onto the VHB tape. This double-adhesive method survives years of shelf rearranging. Run cables along bookcase backs using cable raceways or command strip clips—visible wires ruin the clean aesthetic you're trying to create.
For sets displayed on glass shelving, mount strips on aluminum channels first (hardware stores sell them as "LED mounting track"). The channels act as heat sinks, prevent adhesive failure on glass, and let you angle lights 45° downward instead of flat against the shelf. That angle change eliminates harsh shadows under baseplates.
Color temperature matters more than most guides admit. "Warm white" (2700K-3000K) matches incandescent bulbs and makes tan, brown, and red bricks look natural—critical for modular buildings and Castle sets. "Cool white" (5000K-6500K) makes white and light gray bricks appear cleaner but turns warm colors muddy. Buy → Shop warm white LED strips on Amazon unless you're lighting Space sets exclusively.
Power matters too. A standard 6-foot shelf needs 3-4 feet of LED strip on the front edge, which draws roughly 4-6 watts. A 10-watt USB power supply handles two shelves; a 20-watt supply handles four. Under-powering strips causes dimming at the end farthest from the power source—you'll notice it immediately once sets are placed.
Professional Lighting Techniques Most Guides Skip
Front edge lighting (strips mounted under shelf overhangs pointing down) works for 80% of displays, but side lighting transforms architectural sets. Mount vertical LED strips on bookcase side panels to graze light across modular buildings—this technique reveals brick texture and creates depth that overhead lighting flattens.
For sets with significant interior detail (the Daily Bugle, Ninjago City, Diagon Alley), drill 8mm holes through back baseplates and insert individual 3mm LEDs on wires. This looks invasive but it's reversible—use brick-built clips to secure wires internally, and the holes hide completely when the set sits against a wall. Test placement before drilling: tape LEDs temporarily, check the effect from your normal viewing angle, adjust until the interior glows evenly.
Backlighting (LED strips mounted behind sets, between the set and the wall) creates a halo effect that works beautifully for Space sets, Architecture skylines, and anything with a dramatic silhouette. Use diffusion film (frosted shelf liner works) between the strip and wall to prevent visible LED hotspots. This technique photographs exceptionally well—check our guide on how to photograph LEGO sets for camera settings.
Display case lighting requires different planning. For cases like IKEA Detolf or similar glass cabinets, mount → Shop display case lighting on Amazon on the case frame, not inside shelves. Frame-mounted lights eliminate shadows between shelves and create even top-to-bottom illumination. For enclosed cases, stay under 15 watts total to prevent heat buildup—plastic yellows above 85°F sustained temperature.
Powering and Controlling Your LEGO Lighting System
Most collectors start with individual USB adapters per strip, then quickly hit outlet capacity. A single powered USB hub with 7-10 ports consolidates power, reduces cable clutter, and costs $25-35. Position the hub behind the display unit, run one power cable to an outlet, and plug all LED strips into the hub. Add a smart plug ($15) if you want voice control or scheduled on/off times.
For advanced setups with 20+ sets across multiple rooms, consider a 12V LED system with a central transformer. This requires more upfront planning—running low-voltage wire through walls, calculating total wattage, buying wire connectors—but it eliminates USB cables completely and looks professional. Budget $150-200 for a whole-room 12V installation versus $80-100 for USB hub-based systems.
Dimming matters for evening displays and photography. Smart RGB strips include dimming through apps, but dedicated inline dimmers ($8) for standard white strips give you physical control without phone dependency. Mount the dimmer dial within arm's reach—you'll adjust brightness more often than you expect based on time of day and what new releases you're showcasing.
Battery-powered solutions work for temporary displays or rooms without nearby outlets, but AA batteries last only 20-30 hours of continuous use. Rechargeable CR2032 coin cell packs extend runtime to 40-60 hours but cost more upfront. Reserve battery power for seasonal rotations, not permanent display lighting.
What to Avoid: Common LEGO Lighting Mistakes
Overlighting kills the effect you're trying to create. LED strips produce 150-300 lumens per foot—a 4-foot strip generates as much light as a 60-watt bulb. Two strips on a single 3-foot shelf create glare that washes out detail instead of revealing it. Start with one strip, view the result at night, add more only if shadows remain. The goal is subtle enhancement, not interrogation room brightness.
Heat from high-wattage LEDs can yellow ABS plastic over time. According to research on polymer degradation, sustained temperatures above 80°F accelerate yellowing in white and light gray bricks. Stick with 5V LED strips that run cool to the touch, and avoid placing high-output work lights near valuable sets. If the LED strip feels warm after 30 minutes, it's too powerful for direct contact with LEGO.
Cable management separates amateur displays from professional-looking collections. Every visible wire detracts from the build itself. Use white cables on white shelves, black cables on dark wood, and always route cables along edges or behind sets—never draped across baseplates. Velcro cable ties every 12 inches keep bundles tight and adjustable for future rearranging.
Color-changing RGB strips look impressive in photos but create viewing fatigue. Constantly shifting colors prevent your eyes from adjusting, making it harder to appreciate building techniques and color blocking. If you want RGB for special effects or photography, install them as secondary lighting you can disable for normal viewing. Warm white strips should handle 90% of runtime.
FAQ
Do LEGO-specific light kits void the "new in box" value of sealed sets?
Installation requires opening the box and partially disassembling the build, which automatically converts any set from "new/sealed" to "used/complete" status in the collector market. If you're lighting sets for long-term investment purposes, expect reduced resale value regardless of how carefully you install lighting. Most collectors who light their displays prioritize enjoyment over maximum future returns.
Can LED lights damage or discolor LEGO bricks over time?
Quality 5V LED strips operating under 2 watts per foot generate minimal heat and pose no discoloration risk under normal use. However, high-powered LED bulbs or halogen accent lights produce enough heat to yellow ABS plastic with prolonged exposure—avoid any light source that feels warm to the touch after 15 minutes of operation.
What's the best way to light transparent and translucent LEGO elements?
Position lights inside the structure pointing toward translucent pieces rather than shining through from behind. This creates an internal glow effect instead of flat backlighting. For windows, mount LED strips on interior walls parallel to the window rather than directly behind it—this simulates room light and prevents harsh hotspots.
How do I hide wires in modular buildings and large display sets?
Route wires through hollow columns, behind wall panels, and under base plates using brick-built channels. Create removable back panels using Technic pins so you can access wiring without deconstructing the entire build. For multi-level modulars, run wires vertically through corner studs and use tan or brown cables that blend with common brick colors.
Are solar-powered LED options viable for LEGO displays?
Solar-powered LED strings designed for outdoor decorations work for temporary displays near windows but lack the consistent brightness needed for permanent collection lighting. The panels require direct sunlight for 6-8 hours to power LEDs through the evening, and cloudy days leave displays dim or dark—making them impractical for year-round use in most home settings.
Light Your Collection the Right Way
Start with one shelf, test different positions, and expand only after you've found what makes your collection look best at night—because that's when proper LEGO display lighting turns a hobby into art.
Some links on this page are affiliate links. We may earn a small commission if you purchase through them, at no extra cost to you.
The Brick Slayer is an Amazon Associate and earns from qualifying purchases. This article contains affiliate links; if you buy through them we may earn a small commission at no additional cost to you.
Keep leveling up
More From the Workshop
Set reviews, release dates, and the gear builders trust.